SHORE Hardness
| Ein Service der |
|---|

|
| Polymer Service GmbH Merseburg |
| Tel.: +49 3461 30889-50 E-Mail: info@psm-merseburg.de Web: https://www.psm-merseburg.de |
| Unser Weiterbildungsangebot: https://www.psm-merseburg.de/weiterbildung |
| PSM bei Wikipedia: https://de.wikipedia.org/wiki/Polymer Service Merseburg |
SHORE Hardness
Basics
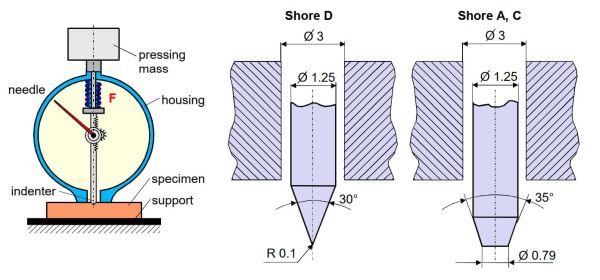
The SHORE hardness, named after Albert Ferdinand Shore, is a characteristic value that is mainly used for elastomers and rubber-elastic polymers. It is directly related to the indentation depth and is thus a measure of the material hardness. According to DIN 53505 [1], which was valid until 2012, a distinction is made between the SHORE A, C and D methods. A spring-loaded pin made of hardened steel is used as the indenter. In these methods, the respective indenter is pressed into the test specimen with a spring force and the indentation depth thus represents a measure of the SHORE hardness. The analogue hardness tester and the indenters used are shown in the following schematic Figure 1.
| Figure 1: | Hardness tester according to SHORE A, C and D as well as the SHORE indenter (DIN 53505) [1] |
SHORE hardness test method
For the determination of SHORE hardness A and C, a truncated cone with an end face of 0.79 ± 0.01 mm in diameter and an opening angle of 35 ± 0.25° is used as an indenter in accordance with DIN 53505. For the SHORE hardness D test, a truncated cone with a spherical tip with a radius of 0.1 ± 0.01 mm and an opening angle of 30 ± 1° is used as the indenter. In the SHORE hardness testing method, an additional device is used in conjunction with a measuring stand to increase precision. This device presses the test specimen to be measured with a contact force of 12.5 ± 0.5 N for SHORE A or 50 ± 0.5 N for SHORE D shock-free onto the support of the measuring table.
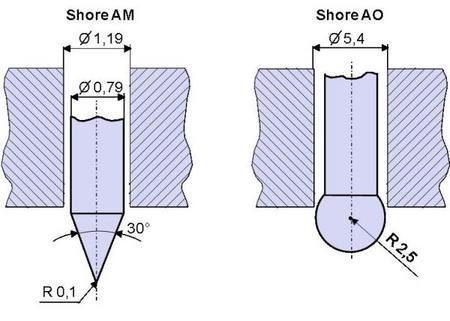
The standard DIN ISO 7619-1 [2], which has been valid since 2012, extends the standardised SHORE hardness test to include the SHORE AO (for low hardness values) and AM (for thin elastomer test specimens) methods (Figure 2) and specifies corrected values for the indenter geometry for SHORE D (R = 30 ± 0.25°). When using a contact force and a stationary measuring stand, a weight of 1 + 0.1 kg instead of 12.5 ± 0.5 N is to be used for SHORE A and a contact pressure weight of 5 + 0.5 kg instead of 50 ± 0.5 N is to be used for SHORE D. At the same time, in this new standard the measuring time has been extended from 3 to 15 s and the storage of the test specimens in the standard climate has been shortened from 16 to 1 h. The internal calibration in the laboratory should be carried out weekly with six elastomer blocks of different hardness as calibration standards, whereby these standards are to be checked annually by an external calibration laboratory. For a secured hardness value, 5 individual measurements instead of 3 are now to be realised.
| Figure 2: | SHORE-Indenter AO and AM according to DIN ISO 7619-1 [2] |
A scale ranging from 0 Shore (2.5 mm indentation depth) to 100 SHORE (0 mm indentation depth) was introduced to determine the SHORE hardness values. The scale value 0 corresponds to the maximum possible impression, i.e. the material does not resist the indentation of the indenter. In contrast, the scale value 100 corresponds to a very high resistance of the material to indentation and practically no Hardness impression is produced.
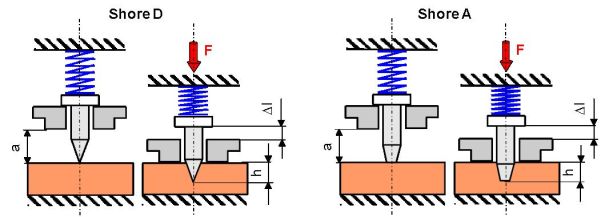
SHORE hardness A is used for soft rubber and SHORE hardness C and D for elastomers and also soft thermoplastics. When determining SHORE hardness, temperature plays a decisive role, so that the measurements must be carried out in a restricted temperature interval of 23 °C ± 2 K in accordance with the standard. However, a temperature chamber can also be used to determine the temperature-dependent hardness. The thickness of the test specimen should be at least 6 mm. The hardness is to be read 15 s after contact between the contact surface of the hardness tester and the test specimen (Figure 3).
| Figure 3: | Schematic test sequence for hardness testing according to SHORE A and D |
Re-evaluation of SHORE A and SHORE D hardness
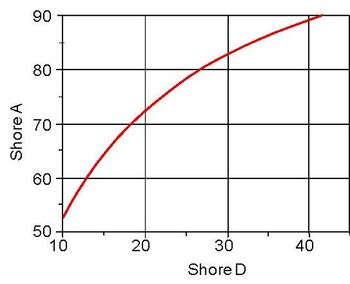
There is a possibility of re-evaluation between the SHORE A and D methods. This correlation is influenced by the indenter geometry and the load level, which makes the functional correlation strongly non-linear (Figure 4).
| Figure 4: | Theoretical relationship between SHORE A and SHORE D hardness according to K. Tobisch [3] |
Comparison of standards for determining SHORE hardness
As a result of the different test standards for determining SHORE hardness, there are different requirements for the measuring technique for identical spring forces, which are documented in Table 1.
| standard | DIN ISO 7619-1 (2012-02) [2] |
DIN EN ISO 868 (2003-10) [4] |
DIN 53505 (2000-08) [1] |
ASTM D 2240 (2015-08) [5] |
|---|---|---|---|---|
| conditions | ||||
| specimen thickness | 6 mm | 4 mm | 6 mm | 6 mm |
| layering | yes (3 layers) | yes | yes (3 layers) | yes |
| number of measurements | 5 | 5 | 3 | 5 |
| measuring distance | 6 mm | 6 mm | 5 mm | 6 mm |
| holding time | 3 s vulkanisates 15 s TPE |
3 s/15 s 1 s acc. specification |
3 s 15 s |
< 1 s |
| load | 1 kg SHORE A 5 kg SHORE D |
A: 12,5 N ± 0,5 D: 50,0 N ± 0,5 |
A: 12,5 N ± 0,5 D: 50,0 N ± 0,5 |
1 kg |
| hardness value | 54 Shore A 3 s 54 Shore A 15 s |
A/15: 54 A/1: 54 |
54 Shore A 54 Shore A 15 s |
A / 54 / 1 A / 54 / 15 |
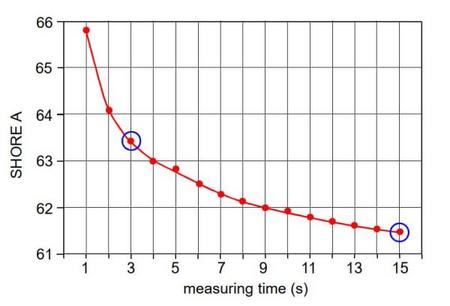
If a systematic comparison is made of the SHORE A hardness values as a function of the load duration under otherwise identical test conditions on a TPE material, the functional relationship shown in Figure 5 is obtained. It can be seen that the hardness values decrease as expected with an increase in the holding time or measuring time.
| Figure 5: | Relationship between SHORE A hardness and measuring time |
Application examples
For a better understanding of SHORE hardness, some practical application examples are shown below (Table 2).
| SHORE A | example |
|---|---|
| 0 | is about the strength of gelatine |
| 10 | gummy bears |
| 50...70 | tires |
| 100 | hard plastic |
Table 3 shows SHORE A hardness values for layered silicate reinforced elastomer materials (own investigations Polymer Service GmbH Merseburg (PSM)).
| filler content (phr) | SHORE A at 23 °C | SHORE A at 70 °C | |
|---|---|---|---|
| IR/Dellite® 67G | 2 | 42,7 ± 0,5 | - |
| 7 | 44,3 ± 0,3 | - | |
| 22 | 51,7 ± 0,4 | - | |
| NR/Nanofil® | 0 | 29,4 ± 0,1 | 29,9 |
| 5 | 31,7 ± 0,0 | 31,9 | |
| 10 | 34,1 ± 0,8 | 34,3 | |
| 15 | 37,0 ± 0,4 | 36,5 | |
| 60 | 57,2 ± 0,1 | 53,5 | |
| 70 | 60,3 ± 0,3 | 56,3 |
Table 4 below gives some examples of SHORE values of hardness for thermoplastics.
| material | SHORE harndess A | SHORE hardness D |
|---|---|---|
| PS | > | 80 |
| PMMA | > | 87 to 88 |
| PC | > | 82 to 85 |
| PVC-U | > | 75 to 80 |
| ABS | > | 75 to 80 |
| PE-LD | 95 to > | 40 to 50 |
| PE-HD | > | 50 to 70 |
| PP | > | 65 to 75 |
| POM | > | 79 to 82 |
| PA66 | > | 80 |
| PA 610 | > | 78 |
| PA 612 | > | 75 to 80 |
| PA66/GF | > | 85 |
| PP/GF | > | 70 to 75 |
| UP/GF | > | > |
The SHORE hardness values listed in Tables 3 and 4 were determined according to the specifications in the DIN 53505 standard.
In Table 5, a comparison of SHORE A hardness for different test standards was made according to the conditions of Table 1, whereby the material values marked in italics were determined according to conditions that do not normally apply to elastomers.
| standard | DIN ISO 7619-1 (2012-02) [2] |
DIN EN ISO 868 (2003-10) [4] |
DIN 53505 (2000-08) [1] |
ASTM D 2240 (2015-08) [5] |
|---|---|---|---|---|
| mass | 1 kg | 1 kg | 12,5 N (1,27 kg) |
1 kg |
| holding time | 3 s 15 s (TPE) |
15 s 1 s |
3 s 15 s |
<1 s |
| material | ||||
| NBR / N550 (3 phr) + sulfor donor |
50,6 Shore A 3 s 49,8 Shore A 15 s |
A/15: 51,4 A/1: 53,5 |
52,4 Shore A 50,3 Shore A 15 s |
A / 52,1 / 1 |
| NBR / N55 (65 phr) + S (EVS); s. donor + retarder |
71,1 Shore A 3 s 68,0 Shore A 15 s |
A/15: 69,2 A/1: 73,6 |
71,6 Shore A 68,7 Shore A 15 s |
A / 73,4 / 1 |
| EPDM / N330 (80 phr) | 70,8 Shore A 3 s 68,7 Shore A 15 s |
A/15: 69,0 A/1: 73,4 |
71,3 Shore A 68,7 Shore A 15 s |
A / 72,7 / 1 |
| EPDM / N550 (30 phr) | 56,7 Shore A 3 s 54,1 Shore A 15 s |
A/15: 55,9 A/1: 59,3 |
57,0 Shore A 55,0 Shore A 15 s |
A / 57,8 / 1 |
| EPDM / N550 (30 phr) / N330 (27 phr) | 71,0 Shore A 3 s 70,5 Shore A 15 s |
A/15: 70,6 A/1: 72,2 |
72,1 Shore A 70,5 Shore A 15 s |
A / 72,0 / 1 |
One advantage of SHORE hardness testing methods is the possibility of mobile use on components, as hand-held devices are often used.
A comprehensive literature analysis on SHORE hardness valuea for numerous plastics is given in [8], of which selected SHORE D hardness values are shown in Table 6. Due to the importance of the materials, only unreinforced and with 30 wt.-% filler or reinforcement content have been included in this listing, although the actual test standard is unknown in most cases.
| material group | modification | SHORE D |
|---|---|---|
| ABS | 75 – 93 | |
| ABS + 30 M.-% GF | 62 – 68 | |
| ABS / TPE | 46 | |
| ABS / TPU | 58 – 68 | |
| ASA | 75 | |
| ETFE | 60 – 78 | |
| EVA | 17 – 45 | |
| PA 11 | PA 11 + 23 M.-% GF | 70 |
| PA 12 | PA 12 (conditioned) | 75 – 78 |
| PA 12 + 30 M.-% GF (conditioned) | 75 | |
| PA 612 | 73 | |
| PA 6 | PA 6 (conditioned) | 52 – 77 |
| PA 6 + 30 M.-% GF | 48 – 80 | |
| PA 6 + 30 M.-% GF (dry) | 84 | |
| PA 66 | PA 66 + 30 M.-% GF | 77 – 82 |
| PA 66 + 30 M.-% GB | 81 | |
| PA 66 + 30 M.-% MX | 75 – 82 | |
| PAEK | 86 – 90 | |
| PAEK + 30 M.-% GF | 90 | |
| PBI | 99 | |
| PBT | 79 – 86 | |
| PBT + 30 M.-% GF | 53 – 85 | |
| PBT + 30 M.-% GX | 54 | |
| PC | 51 – 85 | |
| PC + 30 M.-% GF | 65 – 72 | |
| PC + 30 M.-% GX | 70 | |
| PCTFE | 76 – 80 | |
| PE-HD | 56 – 69 | |
| PE-LD | 39 – 83 | |
| PE-LLD | 38 – 60 | |
| PE-MD | 45 – 60 | |
| PE-UHMW | 60 – 65 | |
| PEEK | 83 – 88 | |
| PEI | 88 – 90 | |
| PEK | 87 | |
| PEK + 30 M.-% GF | 90 | |
| PET | PET + 30 M.-% GF | 63 – 65 |
| PMMA | 52 – 85 | |
| PMMA + 30 M.-% GF | 55 | |
| POM | 52 – 83 | |
| PP | 59 – 77 | |
| PP + 30 M.-% GF | 62 – 80 | |
| PP + 30 M.-% CD | 74 – 75 | |
| PP + 30 M.-% MF | 60 – 74 | |
| PP + 30 M.-% P | 65 | |
| PP + 30 M.-% CaCO3 | 55 – 70 | |
| PP / EPDM | 40 | |
| PS | 78 – 80 | |
| PTFE | 50 – 90 | |
| PUR | 20 – 84 | |
| PVC-U | 74 – 94 | |
| PVC-U / NBR | 58 – 74 | |
| PVC-P | 42 – 77 | |
| PVC-C | 82 | |
| PVDF | 46 – 79 | |
| SAN | 45 – 85 | |
| SMMA | 72 – 82 | |
| TPC | 28 – 82 | |
| TPE | 48 – 78 | |
| TPE / PTFE | 56 | |
| TPE-E | TPE-E + 30 M.-% GF | 55 |
| TPO | 16 – 70 | |
| TPS | 60 | |
| TPU | TPU + 30 M.-% GF | 74 – 80 |
| TPV | 40 – 51 |
| GF: glass fibres, GB: glass balls, MF: mineral fibres, MX: unspecified mineral filler, GX: unspecified glass filler, CD: carbon powder, P: unspecified filler powder |
References
| [1] | DIN 53505 (2000-08): Testing of Rubber – SHORE A and D Hardness Test (withdrawn) |
| [2] | DIN ISO 7619-1 (2012-02): Rubber, Vulcanized or Thermoplastic – Determination of Indentation Hardness – Part 1: Durometer Method (SHORE Hardness) (ISO 7619-1: 2010) (withdrawn, replaced by DIN ISO 48-4: 2021-02) |
| [3] | Tobisch, K.: Über den Zusammenhang zwischen Shore A und Shore D Härte. Kautsch. Gummi Kunstst. 34 (1981) 347–349 |
| [4] | DIN EN ISO 868 (2003-10): Plastics and Ebonite – Determination of Indentation Hardness by Means of a Durometer (SHORE Hardness) |
| [5] | ASTM D 2240 (2015, reapproved 2021): Standard Test Method for Rubber Properties – Durometer Hardness |
| [6] | VDI/VDE 2616 Blatt 2 (2014-07): Hardness Testing of Plastics and Elastomers |
| [7] | Grellmann, W., Seidler, S. (Eds.): Polymer Testing Carl Hanser Munich (2022) 3rd. Edition, pp. 184–185 (ISBN 978-1-56990-806-8; see AMK-Library under A 22) |
| [8] | Koch, T., Bierögel, C., Seidler, S.: Conventional Hardness Values. In: Grellmann, W., Seidler, S. (Eds.): Mechanical and Thermomechanical Properties of Polymers. Landolt-Börnstein. Volume VIII/6A3, Springer Berlin (2014) 357–379, (ISBN 978-3-642-55165-9; see AMK-Library under A 16) |
Compilation of Standards
| [1] | ISO 48-4 (2018-08): Rubber, Vulcanized or Thermoplastic – Determination of Hardness – Part 4: Indentation Hardness by Durometer Method (SHORE Hardness) |
| [2] | ISO 868 (2003-03): Plastics and Ebonite – Determination of Indentation Hardness by Means of a Durometer (SHORE Hardness) |

